Friday, October 22, 2010

Share and Share A-like

We had our Christmas Card making day this past weekend.  We had decided we wanted to set aside a whole day where we could really get into our creative mode.  So we decided on a space where we could spread out all of “stuff” and boy did we have some STUFF!  We had 2 cricuts, paper for days, stamps to fill a 24”x24” table, glitter from every color of the rainbow, embossing powder and gun, yards & yards of ribbon, brads, embellishments.  It was AWESOME!!!  I know you’re drooling – what can I say – I know how to pick my friends!  It was so much fun to be in a room full of goodies to choose from. DSC_4881 DSC_4882

We had made the decision that we would just create cards and then if it was a “keeper” we would make 3 and share them with each other.  It was a great way to have a varied group to send out.

DSC_4883

DSC_4884

DSC_4885

We are just working away!  Are you ready to see what we made??  I know the suspense must be killing you!

Ok here goes… 

DSC_4906

DSC_4890 DSC_4891  DSC_4893 DSC_4894 DSC_4896 DSC_4897 DSC_4898 DSC_4899 DSC_4900 DSC_4901  DSC_4903  DSC_4905  DSC_4907

I love all the different designs.  Each unique.  What’s your favorite?  Any requests on which one you would like for your card this year??  I’m still trying to decide which one I want to create multiples of…  so many choices.

Wednesday, October 20, 2010

Blair-ing Gold

One of the current projects I am working on is a client’s dining room.  We have already selected the new wall color and it’s already done!  We chose Blair Gold by Benjamin Moore.  Here’s a gander:
2356[1]

So we headed over to Crate and Barrel to shop for NEW furniture – oh how I love some C&B!  We definitely hit jackpot!  We knocked out table, chairs, buffet and rug all in one fell swoop!
For some reason I am not able to get the image of the rug on the mood board. We’ve selected this gorgeous rug :
 AsimiRugBrownAVS10[1]
And here’s the mood board to show where we’re headed…
We still need to select a new light fixture but we’re getting close to installation time!!  I am hoping we can get this finished by Thanksgiving?!?! 
Do have any major changes you are trying to get done before the holidays?

Saturday, October 16, 2010

Christmas Card Inspiration

We had a really good time last week at Paper-Sources, Girls Night Out.  The theme was Christmas cards and we made 4 different cards using various techniques.  I’ll do a quick run down on what we did…

DSC_4864 DSC_4865

We started with a white cardstock fold over card for this one.  Using a paper punch we cut out circle or snowflakes.  (The snowflakes probably turned out a little cuter if you ask me.)  Then we used a small hole punch for the holes at the top for them to hang on our clothesline.  The clothespins and string were a really cute idea.  Although I think this card needed a little umph.  Maybe some contrasting color behind the clothesline?? 

DSC_4868

Now this was pretty dang cute!  I love the combo of turquoise with red.  We stamped the candy stamps and the “peace joy love” in red and then used clear embossing powder on top and used the embossing gun to create nice texture. The red and white ribbon was very cool – it’s TAPE!  Using foam dots we applied the stamped items to the card.  And done! Oh but wait – did you see the contrasting envelope liner – nice touch huh!  Paper Source has templates for all their envelopes which makes it super easy!

 DSC_4869

This is a beautiful stamp!  We added some stickles for added depth. Simple and beautiful!!

DSC_4872

Our last card had a shabby feel.  Again simplistic but I am coming to learn that simple is sometimes best!  I am in LOVE with this “Merry Christmas” and what a sweet little tree too!  We used the chalk inkpads with both of these to give a softer look.

DSC_4879

So after our night of getting great ideas for Christmas cards, I am officially on the hunt for what my plan will be!  We are planning a whole day of crafting so I’ve got to figure this out ASAP!

If you aren’t up for making your own you could always hop over to Paper Source and order your Holiday Photo Cards from them!  AND you can get 10% off right now until October 31st!  One more thing marked off the list.  Just click on the picture below to go straight there!

Save 10% on Holiday Photo Card Orders

Thursday, October 14, 2010

What a find!

So you’ve met my Aunt before here.  But what I may not have mentioned is that she’s a MAJOR yard saler.  She can sniff out a deal better than a hound dog can find his next kibble and bit!  A few weeks ago she came upon a BRAND NEW Kitchenaid Panini maker and Belgium waffle iron and got them BOTH for $20.00.  So when she called me to say she had found some upholstery fabric at a yard sale – I hightailed it over there!
And she wasn’t kidding either.  She had come upon the mother load!  Apparently this very nice lady’s son owns a furniture manufacturing company and she gets all of the COM (customer’s own material) leftover fabric.  There were some gorgeous patterns!  And you may remember I need some fabric for these chairs:IMG_8028 IMG_8032
I wanted a solid fabric for the rattan chair and found a great nubby gold fabric with just enough yardage!  Check it out…
DSC_4862
I really like the tone of the fabric with rattan, so SCORE!!  Oh and I haven’t told you the best part of the story…  That sweet lady with all the fabric was selling them for $2.00 a BOLT!!!!!!!  I know, it’s inconceivable!  It didn’t matter if there was 1 yard or 15 yards - $2.00 a bolt!  The re-decorating gods were smiling down on us.
Now for the other retro – chair I am really feeling a houndstooth pattern, I found this fabric last weekend at this great little shop over in Southend, Modern Fabrics.  It’s definitely not $2.00 a bolt but I feel like since I lucked out on the other I can afford a little more and get exactly what I want.
DSC_4861
You may have caught a glimpse of another fabric behind that pretty gold…  Let me give you a better look at that:
DSC_4858 
Isn’t that funky cool?  It’s taupe, gold and turquoise embroidered kinda sorta.  I loved it when I saw but didn’t know exactly what I would use it for.  When I got it home and started looking around I thought it would be a great addition for window treatments in the living room with the new upholstered chairs.
DSC_4860
I’m loving the combo!  The orange pillow is from the sofa and I already have some turquoise pillows I can bring in to pop up the color.  My newly painted turquoise lamp is perfect for the space as well!  I feel a plan coming together!!  Don’t worry I’ll show ya the finished product as soon as it is…  FINISIHED!
Have you found any great deals recently?  Where do you find your fabric?

Tuesday, October 12, 2010

Planning for Turkey

In case you didn't get to hop over to Country Chic Cottage when I guest blogged last week, I thought I would share my thoughts for our Thanksgiving tablescape here as well.

For my plan this year I thought I would start with a fairly neutral slate – a taupe tablecloth:
12-8-09 001
12-8-09 004
To add some different texture I pulled out one of my scarves and used it as a table runner.  This is a great way to make use of different items and give them a dual purpose.  So don’t just go to your linen closet when decorating your table make sure to check in your closet, your scrap fabrics, etc. 
12-8-09 005 12-8-09 007
For the center of the table, I added one of my bamboo placements for the base.  This creates a stronger statement and will give your eye a break from the runner and the actual centerpiece.  The vase I am using has some nice size but doesn’t have a lot of visual volume.  I added some artificial leaves that adds color and texture.  You could definitely use real leaves but I am placing an orange pillar candle in the center so I thought it would be safer with the artificial leaves.  This also allowed me the opportunity to add some height under the pillar candle so it would sit up nice and tall.  Beside the center vase, I placed two votive holders that have a leaf motif, these normally live in the den (don’t forget to “shop” the whole house for items to use!)
12-8-09 009 12-8-09 010
So it’s coming together right?  And we’ve spend $0.00 so far!  YIPPEE!
Okay – on to the place setting.  I LOVE white dishes!  Why, you ask.  Because they go with everything – every season – every decor.  So I knew I would be using our simple white plates but wanted to add a little drama and contrast with the napkins.  Enter lovely chocolate brown:
12-8-09 032 12-8-09 034
I took the extra time to iron these bessies’  it’s totally worth it for the finished look.  Oh and here’s a tip:
** spritz your linen / cotton napkins with water so they are moist – put in plastic grocery bag and put in the fridge for 20-30 minutes.  Use a nice hot iron and you’ll have beautifully ironed napkins**
Ok back to our regularly scheduled program:  I wanted to be a little creative with my napkin rings and to play off the whole “thankful” theme. I wrote different things that I am thankful for:  “faith, family, friends, dessert.”  You get the idea.  I used some sale tags that I happen to have in the craft drawer. Of course you could also use this same concept for place cards as well.  Super simple & super cute!
12-8-09 017  Add in our glassware and silver and we officially have a dressed table!
12-8-09 030
So what do you think?  Do you have a plan yet for your Thanksgiving table?  Are you hosting or will you be going to someone else’s home??

Monday, October 11, 2010

Mountain Crafts

We recently went away for a Girls’ Weekend with my sweet buddies, Julie & Rhonda –(that happen to both be sisters – not my sisters but were so much alike you would think we came from the same bloodline, but I digress.)  Julie and I planned a Surprise Destination for Rhonda’s 40th birthday celebration.

She had NO idea where we were heading and she asked a minimum of 100 times in the car on the way there - “Really!?! WHERE are we going?!?!”  I was loving every minute -  I’m evil like that!  I had asked a sweet friend of ours if we could borrow his mountain cabin for the weekend.  The cabin is hidden in the woods.  You are on a gravel road for 1 mile before you come to the driveway.  So we were nice and secluded in God’s country.

We had an amazing weekend of watching movies, flipping through magazines on the front porch, eating yummy food, and lounging in our PJ’s.  We also found time for a hike and CRAFTS!  What can I say we can maximize 48 hours like nobody else!

Before our trip Julie and I were scouring our “to-do” craft folder and there were 2 different projects we thought would be perfect for our rustic weekend away.  Both involved sticks so what better place to work on crafts with all the supplies already at our destination.

Our first project was from The Painted Hive.  She gave a great tutorial on making a sunburst wreath with sticks.  But I thought I’d show you how ours turned out:

IMG_8006 

We brought some cereal boxes to cut up for our base.  We used 2 pieces but you could definitely use a few more for additional support.  So get your glue gun out and glue the two pieces of cardboard together.

IMG_8007

Now take your twine and wrap around the cardboard. Glue the beginning of twine and then twist around the cardboard and glue the end piece as well.

IMG_8008

All finished with that step…  Now on to the sticks! IMG_8009We started by sorting the sticks, the smaller the better but having a variance in size provided for a more unique look.

IMG_8010 The Painted Hive had used the side with the sticks out front for her “front” and we did the opposite.  A LOT of hot glue was used so I’m not sure how you don’t see that on hers.  But anyhoo.  Kind of make your plan with where you 4 quarters are going to be and then just start filling in.  Until you get this:

IMG_8013

Then we added some floral wire for a hook

IMG_8019 And voila!  A stick SUNBURST!!

IMG_8021 And for our second project, Julie had found this super cute idea over at Delia Creates.  The Spooky Tree Door Hanging was another great idea to work on while away.  Julie just happened to have some old frames lying around so that was free!  IMG_8015
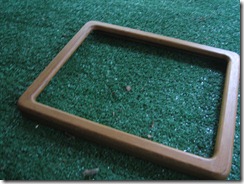
Find your sticks and make your design!
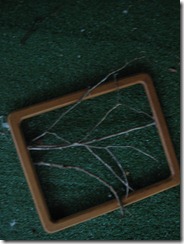
IMG_8016

And then glue that bessie in place!  I loved being able to see how the three of us all came up with different looks even though we were doing the same project.  Here’s Julie’s":
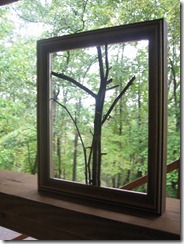
IMG_8017 And here’s mine in it’s new home. 

IMG_8026

IMG_8025

I’m still contemplating painting it orange.  Amp it up a bit…  What do you think?

So we did 2 crafts for 3 people and spent $0.00 – that’s how frugal us girls are!

We had an amazing time away!  We laughed at each, rested and worked out (walking up the HUGE hill twice!) what more can you ask for on Girl’s Weekend when one of your dear friends turn 40!!  Yeah I had to say it one more time.

Saturday, October 9, 2010

B-O-O!

It’s already time to get out all the haunting goodness out of the attic and start doing some SPOOKtacular decorating.  And here’s a super easy little decoration you can do in a sec!
We had a craft night and my sweet friends brought over their Cricut’s but you could do the same concept with printed letters from your computer and cut them out with an exacto knife.
Supplies:
Mis-matched frames
Letters
Scrapbook paper Glue
Exacto Knife
10-10-09 015 10-10-09 016
So once you have your supplies together it’s easy breezy
10-10-09 020 You’ll just glue your letters to your scrapbook paper that has been cut to size of the frames you’ve chosen.  It’s perfect if they’re different sizes and finishes. 
10-10-09 025
And there you have it! 
10-10-09 029
And while you’re at it why not go ahead and make some for Christmas?  “JOY” maybe?  Even “HOP” for Easter.  Or a monogram would be too fun!  The possibilities are endless!  What Halloween crafts are you working on?

Friday, October 8, 2010

Hanging out @ Country Chic Cottage

Come check out Country Chic Cottage today where I’m telling about my Thanksgiving tablescape.  Angie is taking some time off and is having “Fall Break” over on her blog.  All kinds of great ideas are being shared this week! 
pumpkin2[1]
Here’s just a little tease of the tablescape:
closeup
Special thanks to http://www.thecountrychiccottage.net/ for inviting me over!

Tuesday, October 5, 2010

Girls Night Crafting

This will be our second outing to Paper Source for their Girls Night Out.  The first time we worked on birthday cards working with stamps, watercolor pencils, embossing powders and so much more! 

This go round we will be creating Christmas cards and I CANNOT wait!  Check out the eye candy…

Oct-2010-GNO-Blast[1]
And while checking out all the lovelies they have to offer you can get free shipping when you click on the image to the right and use the code provided!  (There’s a minimum order required.)

I’ll be sure to share our creations with you after class.  Will you be making your Christmas cards this year?  Or maybe some fun and funky gift tags??   I think you’ll be very impressed with the many great options Paper Source has to offer!  If you have a store near you I highly recommend checking it out .

Saturday, October 2, 2010

Priorities… or lack there of

I feel like there are so many different projects that we need to focus our attention and money on and I just don’t know where to start!  So I thought if I could just list them all and then figure out some sort of priority list it could help.  So here goes:
Mattress                            Front yard landscaping
Dining Room Re-doRe-upholster Chairs in Liv Rm
Replace remaining 4 windowsFreezer
That’s a lot of $$ to budget out!  So trying to prioritize, Joe and I both agree that buying mattress should be our first focus.  You spend A LOT of your life on your mattress and it determines how well you face the next day.  Our current mattress was purchased 10 years ago which is about the normal life span, I believe, but regardless, she is just worn out!  There is a permanent hole on one side and we take turns sleeping on that side to give each other some relief.
So have any recommendations for mattresses?
The #2 priority gets a little trickier.  We both agree that fall is a perfect time to focus on the yard.  The weather is nice, grass could possibly grow now versus the hot summer.  But that’s a lot of mulch to spread and Joe and I are disagreeing on whether that should be a hire out job or a DIY job.  The idea of spreading 10 cubic yards of mulch makes me want to go and hide somewhere - forever!
And after those 2 items…  I’m completely lost on where to go next!  I’m all about getting started on the dining room but should I finish the living room and actually have one room completely done?  (Is being “done” even possible, anyway??)  I need to reupholster the 2 side chairs in the room.  I love both of them but they need some attention.
IMG_8028 IMG_8030
My mom found the orange chair at Habitat for Humanity and I love the vintage feel.  I also got the rattan chair from my Mom (THANKS Mom!!) and it just needs new fabric on the cushions.  I want to do a neutral on both pieces; I am a big proponent for neutrals on the upholstery and pop your colors in other ways.  I was discussing the options with Shannon and she had a great point:  if you choose a fabric the same tone as the rattan you will be able to appreciate that texture of the natural material; where right now all you see is Navy because of the high contrast.
So anyone know of a good Upholster in Charlotte?  I need some referrals!
For the dining room I don’t even have a direction yet.  I want to marinate on that a little more and see if I can stretch my normal design.  Some it’s time to do some research!  I’m hoping to work on some idea boards to share!
The freezer and the windows just keep getting pushed to the back burner but both are really needed!  Believe me if you saw my freezer you wouldn’t believe that only 2 people live here!  A few years back we replaced all but 4 of the windows in the house.  And from friend to friend – when you replace windows just do them all at the same time.  We thought we would do 1/2 and 1/2 to spread out the cost but now it’s just lost it’s place on the list. 
So that’s my dilemma – what’s your expert opinion??  How do you prioritize your “To-Do’s”?   HELP!