Sunday, January 31, 2010

Dining Room

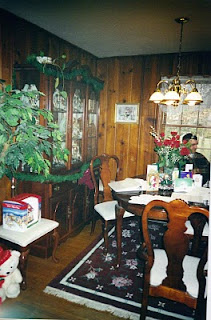
I don't know if I could have eaten in this dining room like it was originally. This room was filled to the brim with STUFF! And check out that picture of Joe - he looks so young!! Sorry back to the room. This room had the pine paneling just like the kitchen, which I felt had to go.

And another view. (that's our real estate agent) Check out the dishwasher that had to be rolled over to the sink to be used. Wowzers!

Okay that's enough of that - now on to the present...


I love the corner cabinet, it was a hand me down from my Dad's side of the family. The bowed front adds a classic and clean lines. I am working on a new look for the table and chairs. Another hand me down from family. A project to come, we'll discuss that more later!


In this shot you can see how the dining room and kitchen connect.

We don't use this space as often as we should. Definitely for dinner parties and such but we end up eating dinner in front of the good ol' TV.
Here's what I want to work on in this room:

New light fixture - I've been eyeing some drum fixtures or maybe this cool one from West Elm?

New window treatments - just simple panels

Re-vamp chairs and table - the new chairs have a bamboo look to them straight out of the 70's
This is a real close example of what they look like:

I think they'll be totally retro cool with a fresh coat of paint. What color paint is still out for discussion... Any projects on the horizon for you? Isn't there always something on the list. What would we do without a list? (Probably make our husbands happier!)

Wednesday, January 27, 2010

The Den

Back to our previously scheduled program - the Tour of the House - before and after. We've moved into the den, which used to be the master bedroom. The previous owner used it as the master as well. It's a nice sized room with 2 closets. So I know you are wondering why on earth would I give up a his and hers closet for the den. Well we didn't exactly give up the closet. My clothes still live in the den and Joe has the closest in our room. We used the 2nd closet to actually house the TV. That way it doesn't take up any floor space in the actual room.

We are loving having the den in here. This is the room we spend most of our time in.

So moving on to the reveal, here's the previous owners' space:


And the now:


This is pretty much the same angle as the first picture. I LOVE the color in this room. It's called "Midnight Pool." It creates a very cozy feel and it really pulls the color out of the art work and the sofa.


Isn't the "8 ball" lamp fun! Another gift from a friend - hey what can I say - I have the best friends!! Speaking of, have you gotten any great gifts from friends you would like to brag about?? We would love to hear about them.


Sunday, January 24, 2010

Old and Improved

You may be wondering how my little project is going... Well she's done!!

A little reminder of what she looked like before:

And for the grand reveal:


I know! She doesn't even look like the same chest, huh?!?! I love paint! And some sleek IKEA hardware goes a long way too!!


She's in her new home.


Pretty sweet!


Have you done a redo recently? Would love to hear about it!!


Saturday, January 23, 2010

The heart of the home

We love to cook - as you can probably can tell by the name of our blog. Joe is a chef so he is used to being in the kitchen. Now our kitchen is not anywhere close to a professional restaurant kitchen, and of course if the budget were unlimited we would totally re-design, add a gas stove, etc. But all in all, we really enjoy cooking in this kitchen. For a small house we have a nice size space and it's great for 2 people to cook at the same time. Joe even mentioned the other day how he like that we use restaurant lingo - like "on your left," "behind," "knife in the sink." It makes us both chuckle.
But moving along to the lovely before:


Can you say "HELLO PINE" geez! That's a lot of orange stained wood! I know a lot of peeps out there cannot believe we painted over all that wood, but we had to! It was serious. You have to agree with that!

There were a good many "issues" with this space in the beginning. The avocado refrigerator was first to go. There were thoughts that maybe we could live a little while with it, but upon further inspection there was no way! It had lived a nice LONG life and I really didn't want to put my food in there. So we got super lucky and found an "over-under" in the scratch and dent area of a local appliance store. So for $600 we scored this super sweet fridge. And we love having the fridge up top!


Then the counter tops added to the "orange" theme that we just weren't feeling. It wasn't in the budget to replace them, so in comes our good friend: PAINT! We started with them being silver and then a few years later, we changed them to black. Needless to say I would love to change them out and eventually but for now it works!

So we lived with the wooden cabinets for a few years and then took the plunge on painting them white. I love white cabinets - something about a white kitchen with dark counter tops just floats my boat! I found the new pulls at Habitat Re-Store for $0.25 each and just gave the hinges a cleaning and a fresh coat of black paint.


Isn't so much more fresh and light!! We also installed a dishwasher on the left of the sink. That has been one of the most amazing additions! YEAH! No more dishpan hands

We also put new flooring in. We went with VCT (vinyl composite tile.) These were super easy to install and they had held up really well. And much less expensive than ceramic tile. The overhead fluorescent light fixture had to go as well. The replacement was from IKEA - a nice sleek halogen that has 5 direct lights that can focus on each work space.


For the back splash I wanted to add some different color and make it feel more like a true back splash instead of just more paneling. We took roof flashing that just happened to fit perfectly(don't you love it when a plan falls together) between the small counter top back splash and the bottom of the cabinets. We used roofing nails to attach the flashing to the walls.

Really happy how this came out!!

The kitchen is large that we were able to add another whole cabinet on the left side of the kitchen. This piece came out of my childhood home. It had the same hinges and knobs - once again another coat of paint and she's gorgeous! On this piece we were blessed to have a good friend install a lovely piece of granite for the counter top. This is our baking space.


Check out the awesome pot rack. This is also from my childhood home and even cooler - my grandfather made it for my mom and now we have it! This is an awesome solution for us - I know some people don't like pot racks but it opens up a lot of cabinet space!

So there you have the kitchen. What do you think? Would you have kept the pine? Anyone replace they're own counter tops?
Thursday, January 21, 2010

El bano

Here's the most used room in the house. Our bathroom is a small space. Our hope is to do some changes in here this year. Oh the lovely to do list - it's never going to be done, is it?? We haven't made many changes in here other than cosmetic ones.


So the before...

And the after...


We changed out the lighting, painted and added some fluff. But that's about it. Amazing what a little paint can do, huh?


We did very inexpensive frames (like $3.99 each!) and displayed some photos I took in Charleston SC one year.


I love our monogram towels - that was a gift from my Aunt Mark. She made them on her sewing machine just using a thick stitch. Pretty easy breezy and super cute!


A little shelf from IKEA - the back piece was originally white and I painted it the same as the wall color so it would blend away. It's nice to have a small shelf to provide a home for a little lamp. Cool clock, huh? Gift again - from my friend Cindy. Lurve it!


So we are just in the planning stage of what the re-vamp plan will be for this space. I found some bargains the other day at Marshall's that may find a home in here.... decision decisions. I would love to do a major redo like Sherry and John did, but I don't know if we'll be that brave!


Any bathrooms that you just love? Would love any ideas, suggestions, etc. you may have!


Wednesday, January 20, 2010

Next stop

We're moving from the front of the house to the back left. This room has previously been our guest bedroom, and then was our den, and now it's our Master Bedroom. I know it's confusing - I like to keep Joe guessing! What can I say you can just move your rooms around in your house and not actually have to move out of your house!!

So this was they way it looked 10 years ago...


And now as our Master Bedroom...


You may remember some of this re-do here. Or how we painted some art on the wall.
Next stop - nobody knows...

Tuesday, January 19, 2010

First stop

on our tour is the Living Room. As you remember from yesterday, we are celebrating our 10th year in our home. And the transformation tour is beginning in the first room you walk into through the front door. So here's is what we saw the first day we saw this house.

BEFORE:


Now I will say that the previous owners style is not mine, but I loved the space. The large front window. The dentil molding on the mantle. It all spoke to me! You can see the green carpet that was there. Thankfully before we moved in we removed all the carpet and refinished all the hardwoods.


And the now...


Now you should know that in the past ten years, this room has been three different colors. What can I say I love paint! The first color was a deep chocolate brown. And then we progressed to a really deep orange, called New Penny. So this is a new thing for us being a light and airy wall color.

So there you have it for the Living Room and it's ten year transformation. What do you think of the before and after? Which room would you like to see next??


Thursday, January 14, 2010

10 years

I can't believe it's been 10 years since we bought our home. I grew up in a similar home - 1950's brick ranch, so I am always drawn to homes like that. I love our house. It's not very big - just 3 bedrooms and 1 bath (the one bath is the big challenge!) But it's perfect for me, Joe and the pup.
I thought a great way to celebrate our 10 year anniversary, would be to show you the before and afters. We took pictures the day we had the inspection, so the previous owner was still living here at the time. We saw lots of potential with the bones of the house! So over the next little bit I will share our 10 year transformation, and needless to say there's still a long list of "to-do's!"

We'll start with the exterior...


This was the picture of the house on the MLS listing. Pretty sweet, right? I love the big trees but we still manage to get a good bit of sunshine. The way it's set back of the street is also really nice.


And here she is on a snowy day a few years back. I have to say the yard is not in any shape in mid-January for blog worthy pics. So you can get the idea from this one. Maybe we'll come back in the spring for a better landscaping update!


And the floor plan - this will give you a feel to how the house is laid out. We do have nice size rooms which a great plus!


Well that's the exterior of our "Home Sweet Home." I look forward to taking y'all inside next!!

Friday, January 8, 2010

In the works...

I wanted to show y'all what I am working on. This chest is going to go in the Master Bedroom as my bedside chest. I am trying to maximize all of our square footage for storage and I have a piece of furniture for my bedside chest now that is the same size but doesn't really provide any storage. So... in comes this beauty


I have sanded, painted and applied one coat of poly so far. Can you guess what color I painted it? I'm not telling yet - you'll just have to wait to see the finished product!
What projects are you working on this weekend?

Wednesday, January 6, 2010

Crunch Bars

This recipe is right up my alley for easy breezy and super tasty!
Not that the butterscotch pie wasn't totally worth it! ;-)

Line cookie sheet with foil. Put a single layer of saltine crackers down.
Melt 1 stick of butter and 1/2 cup of brown sugar over medium heat. Bring to boil for 3 minutes. Pour over saltines and put in 350* oven. Bake for 5-7 minutes until golden brown.

Take out of oven and pour about half a bag of chocolate chips over crackers. Let sit (melt). I actually put it back in the warm oven - after I have turned it off. When you see the glossy color on the chips it's time to spread. It should spread rather easily. While chocolate is still warm spread a cup of chopped nuts over. Then press down (you can use a sheet of waxed paper if you don't want to use your hands.) Put in the freezer - let cool completely and then break into pieces.
**Side note - Just so you don't make the same mistake I did - don't try and use white chocolate or butterscotch chips they don't melt like normal chocolate. It was a tasty combination just not pretty**
This was a big hit at one of our Christmas parties. Another really big hit were Pizza Bites. Good Stuff!!